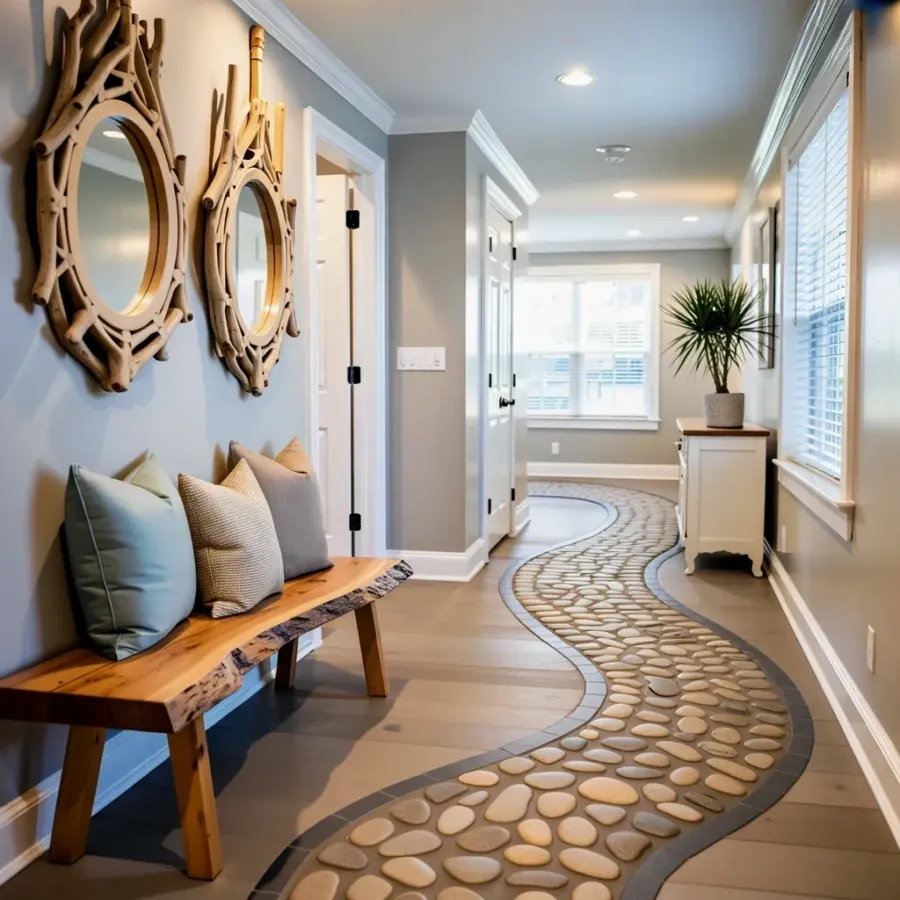
There’s a specific kind of peace that settles over a hallway when it feels less like a pass-through and more like a destination. Right now, I’m picturing a long, narrow corridor where smooth stones curve underfoot, leading your eye to a sunlit window at the far end. The walls are a soft, light gray, the trim is crisp white, and hanging on the left wall are two oval mirrors framed in weathered driftwood. That scene, that exact combination of materials, is what I want to break down for you today. This isn’t about throwing a bunch of seashells on a shelf and calling it done. This is a thoughtful, layered approach to coastal neutral decor, and honestly, it’s a masterclass in texture and patience.
I want to walk you through how to build this look from scratch, even if you’ve never styled a single shelf or picked up a river rock in your life. Think of this as a friendly, no-nonsense guide to creating a hallway that feels like a calm, sun-bleached retreat rather than a cluttered tourist gift shop. We’ll talk about why the rocks work, how the mirrors trick your eye, and the magic of a bench that looks like it grew there. If you’ve been saving coastalstyle images on Pinterest and wondering where to start, this is your starting line.
Building a Coastal Neutral Foundation with Light Gray Walls and White Trim
Before you buy a single stone, you have to get the backdrop right. In the photo that inspired this, the walls are painted a muted light gray, something like a soft fog or a pale seagull feather. It’s not a cold gray; it has a warm, greige undertone that keeps the space from feeling like a hospital corridor. You want a shade that changes with the light, looking almost blue in the morning and completely beige by the evening.
The white trim is just as critical as the wall color. Crisp, bright white baseboards and door frames act like a pencil outline in a coloring book. They give the eye a place to rest and define the edges of the space. Honestly, if your walls are already a decent gray, consider repainting just the trim for a weekend upgrade. It’s the single most satisfying painting project you can do because it transforms the room without requiring you to move all the furniture out.
Here’s the thing about a neutral hallway: it lives or dies by its shades. That means the gray can’t lean too blue, and the white can’t be a creamy, yellowish antique white. You want them to feel like they belong together, like they were born on the same beach. If you can, grab a few sample pots and paint big swatches on your wall. Leave them up for a few days and see how they behave in the morning and afternoon light. The one that looks boring and perfect every single time is the one you want.
Creating a River Rock Path That Wants to Be Touched
Ok so, let’s talk about the real star of this show, the winding river rock path. These aren’t the sharp, jagged stones you find in a quarry. These are smooth, rounded river rocks, the kind that have been tumbled in water for decades until they feel like cool, heavy eggs. In the photo, they are a mix of beige and gray, and they curve organically down the center of the hallway, like a dry creek bed leading to the window.
Sourcing these can be more of an adventure than you’d think. Big box home improvement stores sell bags of polished pebbles, but they sometimes look too uniform, too perfect. I found mine at a local landscape supply yard. I just drove over, paid a few bucks for a bucket, and spent an afternoon picking through piles to find the ones that felt right in my hand. That hyper-specific detail matters because the random variation is what makes the path look natural and not manufactured.
You have a few practical options for actually placing them. You can lay them loose on the floor, which is the easiest and most temporary route. But they will scatter, and your feet will kick them everywhere, which is fine if you live with that kind of chaos. A better method for a permanent look is to embed them in a thin bed of mortar or stone adhesive. It’s permanent, so you have to be sure, but the result is a smooth, level surface that you can actually walk on without wobbling.
- Loose stones: Great for renters or the indecisive, they cost almost nothing.
- Mortar set: This is the heavy-duty, permanent solution that feels like a real architectural feature.
- Rubber pebble mats: A quick fix, but they look a little fake under bright light, so I usually skip them.
The key to the winding part is to avoid any sudden curves. You want a gentle, lazy S-shape that drags the eye forward. Start narrow near the door and let the path widen slightly as it approaches the window. That slight increase in width creates a sense of depth and makes the hallway feel longer than it actually is.
Hanging Driftwood Mirror Frames for Organic Texture
Now look up. Or, look to your left, because that’s where the mirrors hang. The two oval mirrors framed in driftwood are pure coastal decoration magic. They hang on the left wall, facing the right side of the hall, bouncing light around and making the narrow space feel twice as wide. The wood frames aren’t a uniform brown; they have the gray, sun-bleached look of wood that has spent years floating in saltwater.
The genius here is that you don’t need one massive, expensive mirror. Two smaller, identical ovals create a rhythm that feels curated and deliberate. It’s a simple trick, but it forces the eye to move from one to the other, which adds a sense of activity to an otherwise empty wall. These aren’t just for checking your hair before you leave, though they work great for that too.
You can buy driftwood mirrors at coastal decor stores, but they usually cost a small fortune. My honest advice is to make your own. It’s surprisingly easy. Find some real driftwood pieces that are straight enough to work with, cut them to size, and attach them around a basic oval mirror frame with a heavy-duty glue gun. Any gaps can be filled with smaller twigs and sand. The result is way more authentic than anything you’ll buy, and it has that specific, imperfect texture that artificial resin just can’t replicate.
Styling a Live Edge Bench with Neutral Pillows
The other essential piece in this setup is the wooden bench. It’s not a dainty piece of furniture; it’s a chunky, live-edge slab of wood where the natural, wavy outline of the tree is still visible. This bench sits against the wall under the mirrors, giving you a spot to sit down and put on your shoes. The raw, unfinished edge of the wood is a direct contrast to the smooth, polished river rocks on the floor, and that contrast is what makes the design feel alive.
On top of the bench are three decorative pillows in soft coastal shades. One is a light, watery blue that picks up the hints of blue in the gray walls. The other two are probably white and a sandy tan or a woven neutral. They soften the hard wood and add a desperate need to sit down and stay a while. Honestly, pillows on a hallway bench are almost purely decorative. You’re not going to watch a movie there, but they signal comfort and make the space feel inhabited.
When you style your own bench, avoid symmetry. Don’t put two pillows on each end. Place one pillow on the left, one in the middle, and one leaning on the right side. The slight imbalance makes it feel casual and effortlessly thrown together. It’s the difference between a furniture store display and a real home where people actually live, because let’s be real, no one lives in perfect symmetry. That’s just a fact.
Practical Tips for Making the Journey to the Window Feel Longer
So why does this hallway work so well? It’s all about the journey to the window. Having a bright focal point at the end of a dark corridor is a classic designer move. Your brain naturally gravitates toward the light, so the long walk doesn’t feel like a chore. You can enhance this effect by keeping the path clear and obvious, ensuring nothing blocks the visual line from the entrance to the glass.
Let’s get into some practical logistics, because a river rock path is slightly high maintenance compared to a rug. First, you have to make sure the floor underneath is clean and dry. Any moisture trapped under the rocks can sometimes grow mold over a few seasons, especially in a humid climate. A clear sealant or waterproof mat underneath can prevent that headache. Oh, and a broom is your best friend. Dust settles between the rocks, and while a vacuum works, a stiff broom is way more efficient for sweeping everything into a neat pile.
If you love the idea but have a tiny budget, start small. Instead of the whole hallway path, try creating a small rock garden in a wide, shallow planter. Put it near the door, and add a single small driftwood piece leaning out of it. It’s a tiny dose of the same medicine, and it can tell you pretty quickly if you love the feeling of the stones up close or if you’d rather just look at them in a picture. There is no right answer, only what feels right for your own home and your own feet.
Adapting the Look for a Rental Apartment or Temporary Space
Look, committing to a mortar-set stone path is a bold move. For a lot of us, especially renters, the idea of gluing rocks to the floor gives us the kind of anxiety that doesn’t go away when you look at the security deposit paperwork. You don’t have to make it permanent. You can absolutely fake this look with a visual trick. Instead of individual stones, look for a large, rugged bamboo runner or a rug with a painted stone pattern. It’s a compromise, I know, but it captures the same color story.
If you want the real rocks but need an easy removal, lay down a strip of outdoor carpet, then pile the rocks on top of it. The carpet gives you grip and a base so the rocks don’t slide on hard flooring. When it’s time to move out, you just gather the corners of the carpet and lift the whole thing into a bin. It’s like a burrito of coastal style. It takes about ten minutes to install and five to remove, which fits the rental calendar pretty well.
The mirrors are the same. If you can’t hang two big heavy mirrors, buy two light-weight round ones and hang them with temporary adhesive strips. Likewise, the bench doesn’t have to be a massive live-edge log. In a tight space, a simple white wooden bench with a small driftwood piece resting against the legs gets the same vibe across. The point is to evoke the feeling of the coast using texture and shape, not to replicate the exact set list of elements and risk getting evicted.
Okay, So Embrace the Natural Imperfections
Here’s the thing I love most about this look, and it’s something you can’t buy in a store. The imperfections are the decoration. The driftwood is crooked and worn. The river rocks are all slightly different sizes and colors. The bench has gnarly knots and a bark edge that isn’t straight. A perfectionist would go insane trying to align everything perfectly, but a casual observer just feels that it’s beautiful and peaceful.
When you shop, look for items that look a little tired. Choose the branch with a weird bend. Pick rocks that are more dark gray than light beige. Choose a pillow that feels a little rough and linen-like, not one that is silky smooth. This style is all about celebrating things that have been shaped by natural forces. It’s a counter-programming to the sharp, glossy, minimal look that we all get tired of clicking past on the internet.
So, go ahead and gather your supplies. Lay down a drop cloth, paint your walls that perfect warm gray, and start placing stones in a lazy curve across your floor. It will be messy for a minute, and you’ll definitely second-guess your design choices, but trust the process. Once you stand at the end of the hall with your back to the window and look at the winding path, the textured benches, and the sun hitting the driftwood frames, you’ll get it. You’ll see exactly why this simple arrangement of natural things is worth stealing for your own home.
What does your entryway currently look like? Are you team loose stones or team permanent mortar? I’d love to hear how you tackle your own neutral home refresh, so drop a thought in the comments below. And if you try the river rock path, make sure to tag me in a photo, I want to see how it turns out!
Leave a Comment